hey everybody get slaw inside but in every couple of months I get these random packages in the mail from a company called retro flag they make these really cool cases for the Raspberry Pi like this little mini Sega Genesis we looked at a few months ago and basically it allows you to make your own retro console just like the ones you might find from the major manufacturers and today they sent me this which i think is probably their best work to date this is called the retro flag Jeep i case and what it lets you do is take a Raspberry Pi zero and connect it up with this really cool looking Gameboy case that feels almost exactly like the original and it allows you to play all of your retro games on a very retro like device that again feels just like the original Gameboy felt with a couple of extra buttons so we’re going to be taking a closer look at this new device here in just a second but I do want to let you know in the interest of full disclosure if this came in randomly free of charge from retro flag however all the opinions are about two here are my own nobody is paying for this review nor has anyone reviewed or approved what you’re about to see before it was uploaded so let’s get into it now and take a look at what this cool little device can do so let’s take a closer look now at the hardware I have no idea what this is going to cost because it is not yet available for sale but I will update the video description with that information when it is available and what we’ll probably do is a follow up livestream when it does come out because they sent me a Raspberry Pi zero that was configured already there are a few things you need to install to get it to work with the case so I’ll do that so you can see exactly how to get it all working from scratch so in this instance we’re going to focus on the case and how you installed the Raspberry Pi inside and again in the future we will do a livestream on the software setup component it’s not going to be difficult but I think there will be some things that you have to type in from the command line to get it all working now it feels a lot like the original
Gameboy and one thing this company has been putting out is really high quality stuff I refer back here again to that Sega Genesis thing it feels so good and this one really does remind me a lot of the original Gameboy I got in 1989 when I was 13 it’s got a good feel to it overall the display though is color it’s 320 by 240 and for the kind of retro games that you’ll run on a Raspberry Pi 0 this is the perfect resolution for it so I think the games will look pretty nice on here when we do get everything booted up now you do have to buy your own Raspberry Pi 0 to make this work the good news is the Raspberry Pi 0 starts at 5 bucks so it’s a lot less expensive probably than the case will be itself and they’re now pretty readily available there’s also one called the Raspberry Pi 0w that has Wi-Fi built-in that’s a little bit more I think that one’s about 10 dollars and I would go with that to make it easier to get your roms in and out of the device here because part of what you install software wise on here disables the HDMI output and you have to go through and manually re-enable it to be able to hook up an external display through the HDMI port that’s included on it so if you get the Wi-Fi going you can just drop in your roms over the network now this is pretty cool because there is a virtual cartridge in here and when you pop this out this is actually where you put the Raspberry Pi 0 it mounts inside of this case and if you look inside of here they even map the pin outs here almost identically to how the original cartridges used to work and that interfaces with the
display and the controller in there so they took a lot of steps here to go for authenticity in its overall look including designing this really crazy pin mapping here between the GPIO pins that will be on your Raspberry Pi zero and all the functional components inside of the device here it looks like they spent a lot of time figuring this out and I think this is just a cool way to implement it now like the original Gameboy it can run on double-a batteries the only difference is is that this one only needs three double A batteries whereas the original used for I’m going to use some rechargeable nickel metal hydride batteries battery life is going to vary based on the kind of battery that you use in here if you don’t want to use the battery you can hook up an extern USB power supply just like we used to do back in the day with the original Gameboy they have a USB 2 cylinder connector here you can just plug that USB cable into here and the other end into your external battery pack and of course you’ll get a lot more life out of that you got two extra buttons here on the front they added some shoulder buttons here on the side which is pretty cool so for games that require some shoulder buttons you’ve got that so you’ve got a total of six buttons which is nice you’ve got a contrast wheel here I’m guessing that adjust the brightness of the display when it’s going when it’s turned on which we’ll look at in a
second and then over here you have a volume control because there’s a headphone jack here at the bottom just like you remembered it from the original Gameboy so that’s pretty neat the power switch is up here to fire everything up it will take a little bit longer to boot up because it has to boot up the raspberry PI’s Linux operating system but once it’s up you can use retropie which we’ll be doing today to navigate through all of the games to get those working and one of the scripts that you install on here will allow the PI to shutdown safely when you flick the switch which will show you in the course of the video so it won’t just cut power to it it will actually shut down properly and then turn off and we demoed that with these other cases a few months ago and I’ll put a link to that video down below in the video description now one last thing to look at on the hardware side is a USB connector here so you can hook up a USB OTG cable and connect up memory sticks and that sort of thing if you want to transfer files over manually so you do have the option to connect some external USB but you will have to take the Raspberry Pi out to get access to the HDMI port and of course reconfigure the software the only issue I’m seeing on the display is I’ve got some dust under under it here and it just could be that I’ve got a pre-release prototype here so hopefully the real ones will not have any dust under the display but that was one thing that I noticed on mine ok enough blabbering let’s get that Raspberry Pi installed and see how it works alright so let’s flip it over and take out that Raspberry Pi mounting section the
virtual cartridge we’re going to pry that open we’ve got a PCB in here that they want us to remove and the first thing we’re going to do is install a little ribbon cable in the Raspberry Pi and they want you to install this little USB connector on the connector closest to the raspberry PI’s processor and we’re going to fold it down like so the next thing we’re going to do is mount this in the Raspberry Pi case and I believe we’re going to be putting it into this portion first and you’ll see there are some screws in here if my camera focuses there we go so we’re just going to line it up with the screw holes and we’re going to leave that part hanging down there now they’ve got some screws that I have to put in so let me do that real quick we’ll get those screws secured and we’ll go on to the next step alright so we’ve got the Raspberry Pi now secured in the cartridge holder you can see we’ve got these screws on top these screws have another screw hole on them because we’re going to be securing the PC board that came with this kit to the top of the Raspberry Pi these pins will align with the GPIO sockets here on the PI zero and that is how all of this stuff is going to work now what I did right before I started recording again as I installed this ribbon cable inside of this little connector here and the instructions will guide you as to how to get that installed properly it’s really hard for me to get it to work on camera here so there’s a little tiny door that you closed after you get that
ribbon cable inserted there which I have done and you want to be really careful because it will pop out very easily so just keep an eye on that as you put the rest of the other thing together here but it is a probably the most delicate portion of the construction process is getting that cable secured in that slot so the next thing we’re going to do now is just screw the whole thing back together to keep everything in place and pins aligned and once we’re done with that we’ll come back and see if this thing will boot up alright we’ve got everything now secured inside of the virtual cartridge here so as you can see it is all screwed together and everything is aligning properly and now we’re going to just pop that virtual cartridge into the back of our Game Boy device here and flick it on and this again will take a minute or two to boot up because we do have to the Raspberry Pi up to its operating system and then of course launched the front end and again this one came pre-configured so we’ll do one of these from scratch when all the patches are available for download they weren’t available at the time that I was recording the video here so let’s let this boot up here and when it’s ready to go I will show you what games are like on this Raspberry Pi case alright so we’ve got everything booted up now and it takes a little bit of time for it to come up but then you’ve got retropie and if you’ve ever installed retropie on your Raspberry Pi this is the same experience and what better way to start off with some retropie on a Game Boy case then the
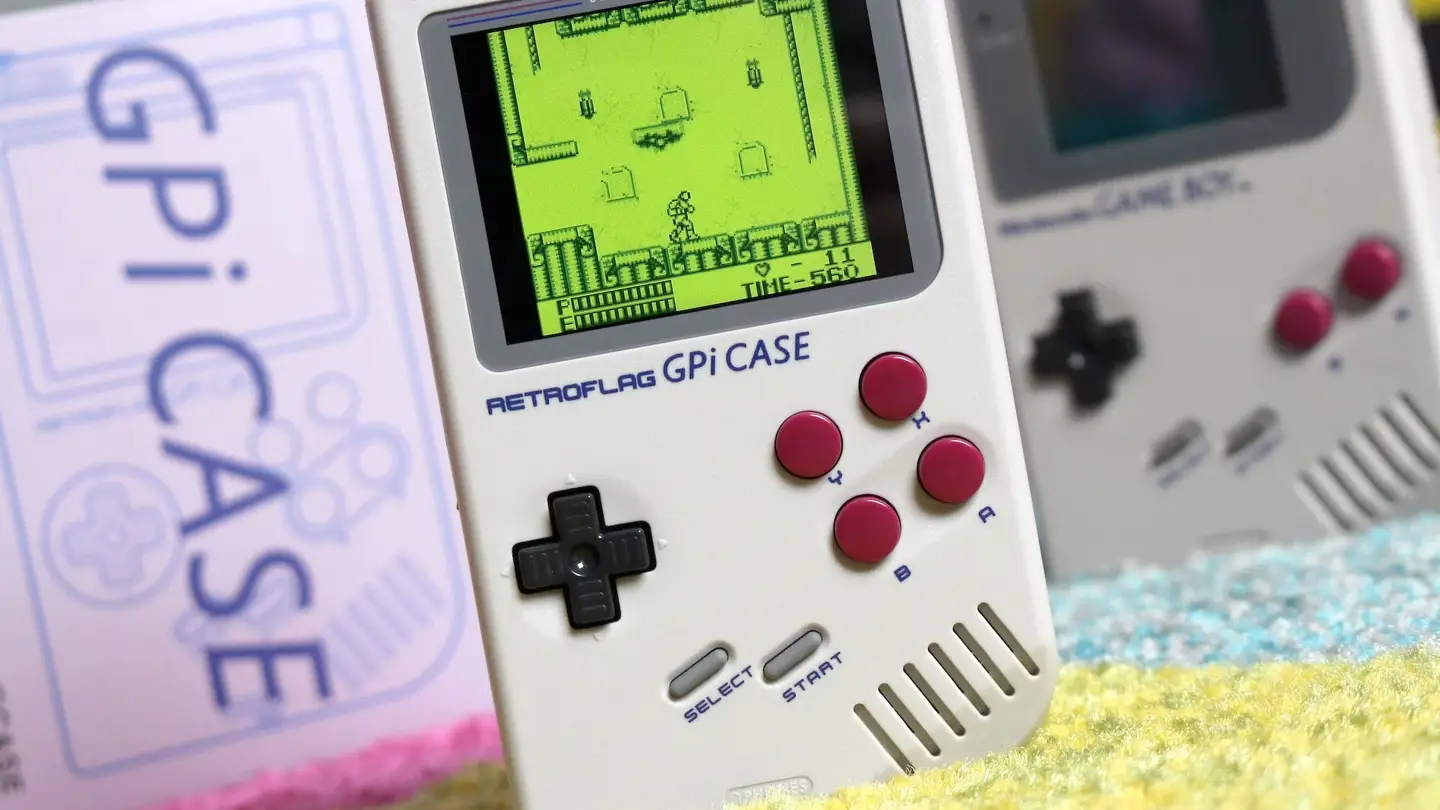
Game Boy itself and we’ll take a look at Batman here and see how this runs just takes a second for it to load up the emulator and the game itself and then what you’ll see here is it basically defaulting to that green hue we all know and love from the original Game Boy days the display on this is very nice it’s got great viewing angles it’s definitely IPs I think it’s the right resolution you don’t need super high res for retro games by any stretch and it looks really good here actually let me pull up the audio for you real quick I’m not gonna go to lasso you can still hear me talk but I did notice that there is a good amount of noise that you will hear over headphones so whatever it’s using to channel audio out to that headphone jack is not very well shielded and that will become evident especially when you have headphones on but music is playing and the game is rocking you’re not going to hear it all that much but certainly in quiet moments you will I was definitely hearing it in the menu area too so that is one area I think just to be aware of that you will get a good amount of noise on there but it feels pretty good the games look great on here it’s kind of fun playing them in a form factor that I remembered playing them in so that was great and overall I think it’s not bad considering what it’s running here the emulation quality will be as good as the status of development on the Raspberry Pi so as things develop on the PI and on retropie and retroarch and all the other emulators that are out there you will see improvements over time and overall I think it’s not a bad little pairing here of a nice retro case with a gameboy emulator let’s take a look though at a few other things so I thought it would check out a PlayStation 1 game next this is Ridge Racer it seems to be
running ok although I’m seeing some slowdown and some graphical glitches here and there and again that’s due to the emulation running on the PI and the fact that we’re using the five-dollar Raspberry Pi 0 to run it also PlayStation is probably pushing it although I’m sure there are some games that might work well on there the speaker down here sounds ok it’s not spectacular but I think it actually is pretty close to what the original game boy had I am hearing that noise through the speaker also especially when the volume is up on it I’ll be back out of here real quick and take a look at some other stuff the display brightness control here works pretty decently you can step it down as you can see here and save your batteries a little bit and you can also go bright on it as well so not bad there now the PI 0 emulates the Sega Genesis quite well and it runs very nicely here on the case of course as you can see we’ve got Sonic the Hedgehog running which is always a very fast game the display looks great we’re not seeing a lot of motion blur if any even when Sonic really gets going here and overall it’s got a really good feel to it now I did test the button latency on this because that is one of the things that you often run into when dealing with a raspberry pi and emulation and what I did is I shot the screen with my iPhone at 240 frames per second and then I jumped around in a few of the
menus to see how quickly things reacted I was using some of the text-based configuration screens to get a good immediate response to a button press and I’m getting about 80 to 100 milliseconds of latency on the controller with this and that’s due to the fact that we’ve got a low powered Raspberry Pi we’ve got to display going here we’ve got some USB to deal with so it’s about where you would expect a PI to be with latency which means it won’t be as good as an original console and certainly not as good as the more expensive FPGA based devices we’ve looked at recently from analog but it’s not any worse than what you would get with other raspberry PI’s so you will feel it a little bit I think especially for a game like Sonic that is very much dependent on very accurate button pushes but it’s not something that was as bad as some Android emulators I’ve seen in the recent past here so not too bad on the button latency front again about 80 to 100 milliseconds as you’re running around on there now another good pairing for this form factor is the Game Boy Advance which used two buttons as well plus the two shoulders here on the back I’m running a Metroid here it seems to be going okay there are some games that feel a little bit sluggish on the GBA on the PI 0 I’m going to point you to ETA primes channel because he’s done a lot of work on these emulators and I think you might be able to get some tips on tweaking the PI 0 to work best
with some of these Gameboy Advance games but I think your best success will be Game Boy Game Boy Color the NES the Sega Master System maybe the Genesis as well but don’t expect a lot out of this little processor this is not the same experience as what you would get out of the Raspberry Pi 3 which has much greater performance than the 0 does here but overall I think this is a really cool case that is very well constructed from a hardware standpoint my only disappointment with it is the fact that the audio isn’t very well shielded so you will hear some noise on headphones and if you’re sensitive to that it’s going to bug you but the feel of it is excellent it really has an original plastic feel to the original the controller feels very authentic everything about this really reminds me of all the many hours I spent playing my game boy back in the day and if you configure it correctly when you throw the switch here what’ll happen is is it will execute a script that will shut down the PI properly as you can see here it is now quitting the emulator and running through all the standard shutdown procedures so that when I do throw the switch on it and wish to turn it off it actually shuts down without just randomly cutting power to the device and that is definitely the preferred way to go so there will be some steps involved in getting this to work not only from the hardware standpoint but also from the software standpoint we’ll come back again with a live stream detailing how
to get the software configured once all of the patches are available but I just like what they did here this is a really cool cept and it’s actually functional provided you are setting your expectations properly for what the raspberry pi zero can do and I would imagine over time if they release newer raspberry PI’s zeros that fit in the same form factor that might be more powerful this will continue to get better there over time so altogether a really fun little quick project you can do by a five-dollar raspberry pi zero and you’re pretty much in business here with a fun little kit that you can put together yourself and have a very nostalgic run at some old games and some newer ones too with a nice display on a very familiar case design so we’ll be back soon with more on this and once it is available I’ll put a link as to where you can buy it and until next time this is Lyon Simon thanks for watching this channel is brought to you by the lawn TV supporters including gold-level supporters the four guys with quarters podcast Tom Albrecht in Cali an Kumar if you want to help the channel you can by contributing as little as a dollar a month at over two lon TV slash support to learn more and don’t forget to subscribe
Read More: Review Nebula Capsule II Android TV Projector

